


Create and Print your passport-size Photographs with Photoshop
Today, I am gone show you how to Create and
Print your passport-size Photographs with Photoshop. It’s very easy when
you read whole article. If you like the Article then subscribes your e-mail
address so I will get motivation to write more articles.
1. Open your Photoshop software
and bring your desired image to create striking Passport size photo. Now select Crop
Tool by pressing C on
your keyboard or you can go to left hand side penal and select it. Another
important thing is to describe the properties of selected tool and
it should be Width 35 mm, Height 45
mm.

2. In our next step just adjust
photo which you want to crop. The tool automatically acquire the define height,
width which we mentioned in tool properties earlier. When you are happy with
your selection just double click on it or hit Enter key.
3.
Before going into further details unlock your working layer simply
by double clicking on it and then go for Quick Selection Tool (w).You can
choose Add to Selection for
selection and Deselect choose Subtract
from Selection. Then press DEL button to clear background.

4.
Select Rectangular Marquee Tool (M). Right click on the central
point of your image and choose option called Feather Radius: in Pixels and that
should be 1 or 2 pixel as per the image requirement then Press Ok.
Then press CTRL + D to deselect
the selection area.


You can Skip step 3 and 4 If
you see my another Blog Remove Image Background
Just click on the Image
 |
5. After that select Rectangle Tool (U) and draw Rectangle or square.
Select color whatever you need for your background. This layer must be under
Photo Layer.

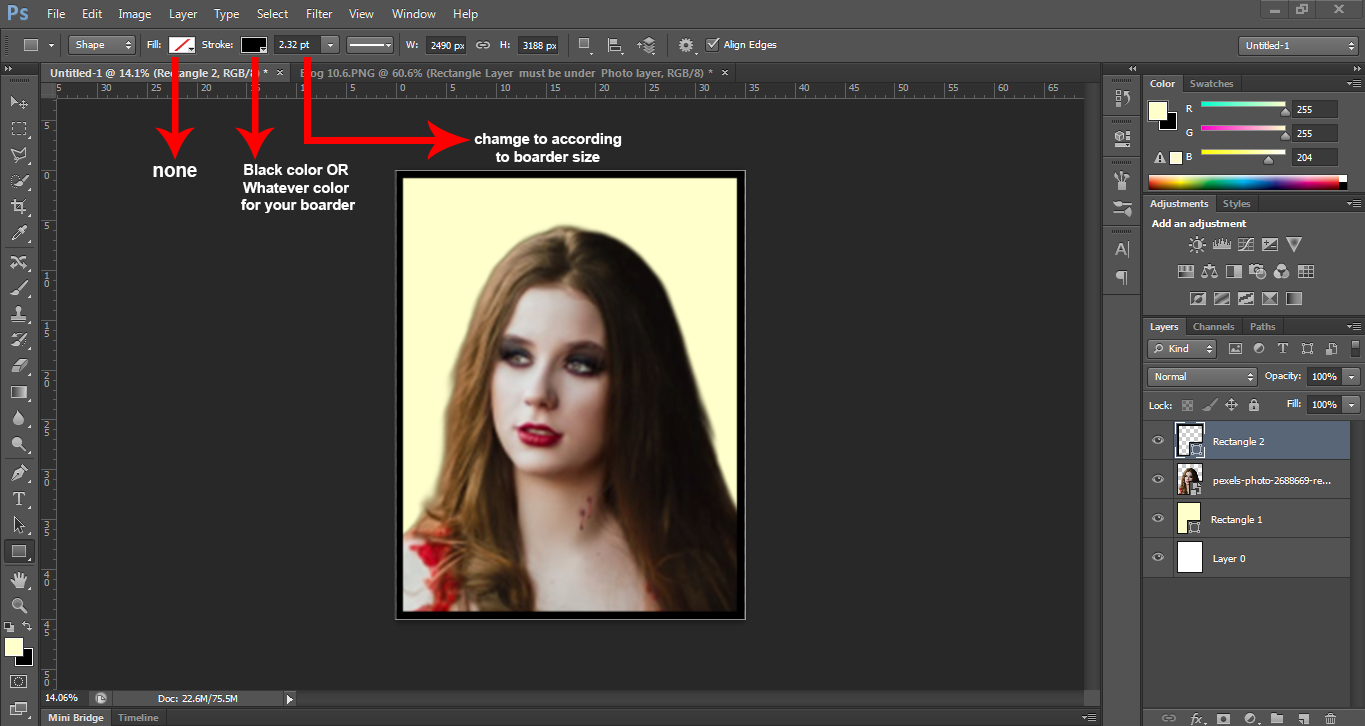
6.
If you want a border to your photo take another Rectangle.
Choose fill to none. Strokes to
Black color or whatever color you want.
As seen under the Picture.
7.
Finally, go to File > save for web > save as JPEG in New
folder.
Then in new folder Paste JPEG
for 15-16 times.
8.
Then go to File > Automate > Contact Sheet II > Choose
folder `>
Select New Folder

Documents

Width: - 8
Height: - 11
Resolution: - 300 pixel
Thumbnails
Columns: - 5
Raw :- 5
Then hit OK
Conclusion
You will get your full page of
Passport size Photos just print and cut.

Do you want to start your own Blog?

Create and print your own passport-size photographs with Photoshop
 Reviewed by PhotoshopHelper
on
July 26, 2019
Rating:
Reviewed by PhotoshopHelper
on
July 26, 2019
Rating:
Reviewed by PhotoshopHelper
on
July 26, 2019
Rating:


No comments: